Optimizely Installation Instructions
Below you will find detailed instructions on how to install Optimizely CMS12, including the Alloy Demo content on your local machine. Once installed, you’ll be ready to create your own bespoke content managed site, with the added benefit of ready to use templates to show you the way.
To get started you’ll need the following pre-requisites:
Microsoft Visual Studio
Microsoft SQL Server Express
How to Install Optimizely Templates
First you will want either create or navigate to the folder where you want to install the Alloy Demo site. The Optimizely templates are installed through PowerShell, so from this folder open a PowerShell window and enter the following command:
dotnet new -i EPiServer.Templates
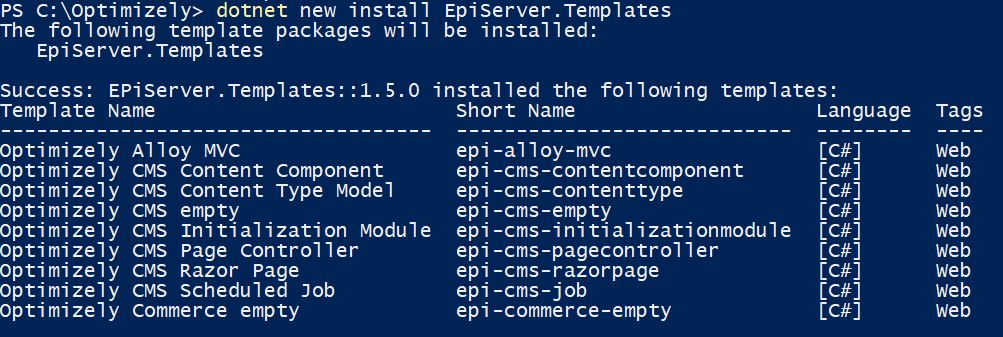
Once the templates have been installed, you will see the following success message above. As you can see there are a number of Optimizely templates to choose from. We want to install the Alloy template, so enter the following command:
dotnet new epi-alloy-mvc --name <name_of_project>
You can use the –name parameter to specify the name of the Visual Studio Project, here I’ve called mine ‘OMVPAlloy’.

Running the Optimizely Template
Once the Alloy templates has been successfully installed, run the following command to restore the relevant NuGet packages and build the project:
dotnet build

Navigate to the installation folder, you will see that all the necessary project files have been created. Open the csproj file in Visual Studio and click run. A browser window will open to the Register screen where you can create and Admin user with a username, password and email address. Enter the required details and submit. You should now have access to Edit Mode of the CMS.
Additional Optimizely Templates
You now have everything you need to get started with creating your own Optimizely CMS12 site. As we saw there are additional templates you can install, such as an empty CMS or a Commerce template. Feel free to give these a try following the steps outlined above.
Additionally, through the Optimizely NuGet feed, you can add more features to your template project with packages provided by both Optimizely and third-parties. You can browse the Optimizely NuGet feed to see what is available.
You’ve seen how to install Optimizely CMS12 in just a few short steps, though PowerShell and NuGet templates provided by Optimizely. If you have any questions or would like help developing Optimizely solutions please get in touch or read further articles about configuring Optimizely.
To install the Optimizely CMS12 Alloy template, you will need to have Visual Studio and SQL Express installed, and be able to run PowerShell commands.
First, install the Optimizely templates:dotnet new -i EPiServer.Templates
Then, install the Alloy demo content:dotnet new epi-alloy-mvc
Finally build the project:dotnet build
Once installed, run the project in Visual Studio and register and administrator account. You now have everything you need to develop your own Optimizely content managed site.